���������������
����������������������������������������������� ��� Building�� Applying and Separating Model�s
��������������� This Model
is based on Planets as they apply and separate from each other at angles the
user picks.
�Most common ones are;
0�� 60��
90�� 120�� 180� You will fine on some markets� 30 ��
45� works good.
�You can build this
Model with Geo or Helio. I have worked both and each one has its good and bad
points.
I like to build both myself. �If you build Geo also add in Direct and
Retrograde. After you build the Model and test it out then add them in. Compare
each Model and then; test, test and test to see which one is best.
�You will be working
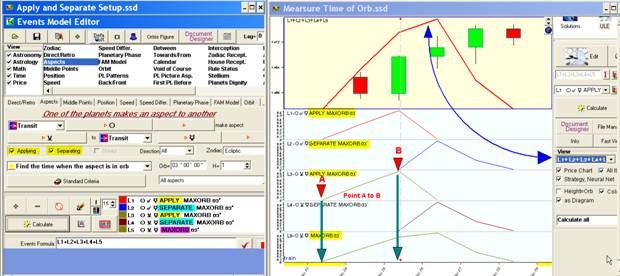
with two windows open at the same time one side by side each other. On your
left I have Event Model Editor and on the Right I have HYPED open, ( Also named
Model Editor) this is where you place the weights for each line.
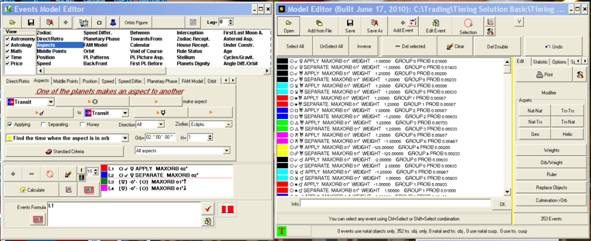
There is two ways to Build this type of Model. You can use �One
of the planets makes an aspect to another. In here the aspects is already
set, I mean you have your pick of what degree you want 0� 30� and so on. This
is what you are looking at in the pic on the left side.
�
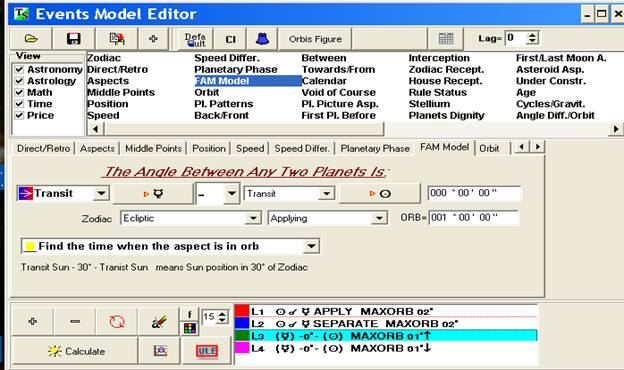
You can use; �The Angle Between any two Planets is;�
Here you set the Degrees and also the Applying and Separating you will have
arrows pointing up or down. By using this one, you can pick any degree and
minute or minutes you would want to work with.
I have used both of them; however the second one gives you
more flexibility when working with Degrees and minutes.
����������� Let�s talk
about ORB�s. If you want the most out of your Model, you need to understand how
Orb�s will play in your Model. You will soon see that by working with shorter
orb�s you will come up with a more choppy sometimes Zig Zag Lines and not a
smooth projection that you was wanting. Take your chart and work with the Bars
on the chart, then take the same chart and place a line on the close. In TS it
is called, Line on Close. This is the type of line that you are attempting to
develop.
����������� Orb�s from
000�10�00� too 030�00�00� will show a large effect on the entire Model. So stop
and think about Orbs and what planets will be used as well as what size the Orb
will be for that Planet. Try and mix the orbs up, use 2� then try 5� and then
move on up to 10 or 20. You will see real soon how the Orb size changes your
Model�s outcome.
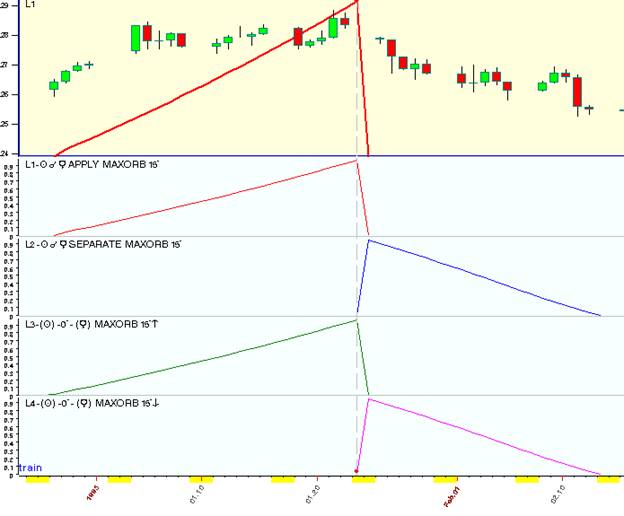
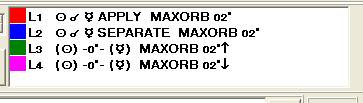 � Here we are working with 2� orbs. All four
are the same. There are two for Apply L1 and L3 and two for Separating L2 and
L4. Let�s look at how 2�Orb works and looks like.
� Here we are working with 2� orbs. All four
are the same. There are two for Apply L1 and L3 and two for Separating L2 and
L4. Let�s look at how 2�Orb works and looks like.
������������������������������� I need to
tell you that we are working with Daily Data. Each bar is a Day.
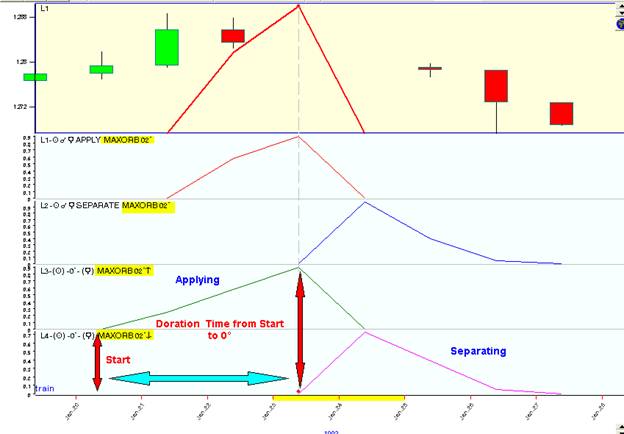
Now take a look at what 5� orb looks like. How many days can
you count? If we use 10� or 20� you get even more days for this aspect. Work
with a few of them and see what you come up with. Be sure that you understand
what and how Orbs work.
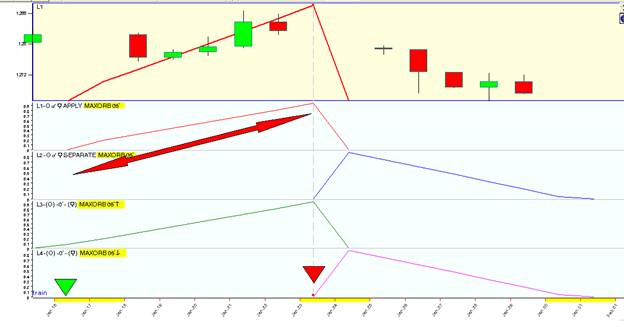
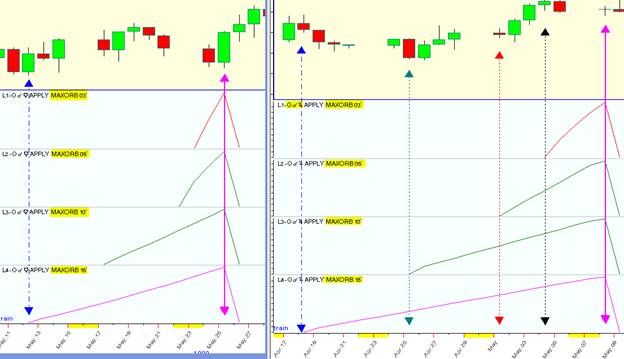
�Look at one more this
is orb of 15 �; note the length from the start of the Aspects to�� 0� (Culmination).
��Go back and look at each one and you will find
what the length of the orbs dose.
�2 � orbs it runs from
Jan 20 to Jan 25 (5 days)� 5� orb run from Jan 15 to Jan 25�(10 days)15� orb
Dec 28 to Jan 24�(29 days)
�There is
two ways to fine what the length of a aspect is in Time. First enlarge your
screen to be able to see the dates at the bottom of the chart or you can use
Document Designer and look up the aspects and date that you are working with.
Document Designer is found on the right side in ULR under Calculate.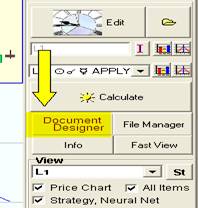
In here you will find each Aspect you have in Events Model
Editor at the time. Let�s look at the last picture of 15� orb.� Click on Document Designer and you should
have this.

�Note that
the more Market Data you load the more Aspects you will have. This also depends
on what kind of Aspects you are working with. You know if you work with Sun to
Mars say for 20 years you will have let�s just say 60 aspects. But if you use
the same data and you are working with Jupiter to Neptune you may have only 2
aspects.� I did not set and figure out how many aspects, but you got the point of what I�m
talking about.
� ��������� ����������� Let�s go back and recap on what we
have learned so far.
1.
�We have learned how to developed Aspects for
Appling and Separating.
2.
Aspects ���������������������� ��One of the planets makes an aspect to
another�
3.
Fam Model ���������������� ��The Angle Between any two Planets is�
4.
Orbs �� ����������������������� ��We walked through how ORB�s work as to time
of the Orb�s.
5.
Document Designer �� ��You have learned what and how to use Document
Designer.
For more detail of what we have talked about so far you can go to Timing
Solutions web site and read more about what you feel you need. Sergey has done
a great job stepping through each step. If you are new to TS, I encourage you
to read and work through each one. It will be well worth your time spent.
Start with this site;� www.timingsolution.com/TS/Study/Classes/ule_examples.htm
and move on to the next site. www.timingsolution.com/TS/Study/Classes/class_ule_3.htm
�If you are looking for more info
and you cannot fine it on the site go here and type in what you are looking
for.
www.timingsolution.com/TS/FAQ/ts_db.htm
You will see an Open Box just type in click on Search, the little box to the right.
And it should pull it up based off of the key words you typed in.
������������������������������� �ORB�s working with the correct Orb
throughout your Model
�Before you start
building your Model, you may want to think about how the Orb�s is going to not
only show the Orb but also how it will do in the overall Performa�s.� Let me explain, you have the options to
change the way you work with Orb�s.
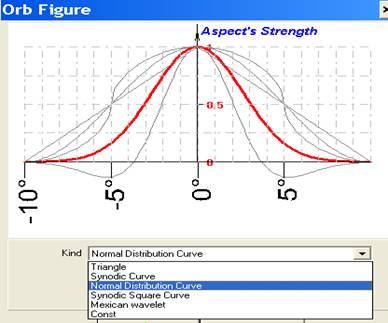
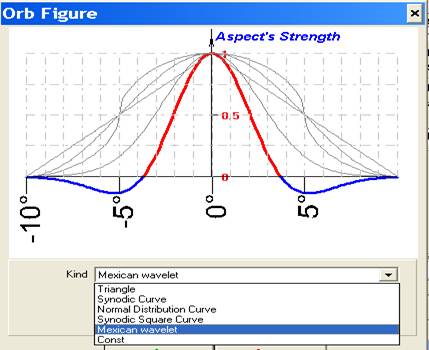
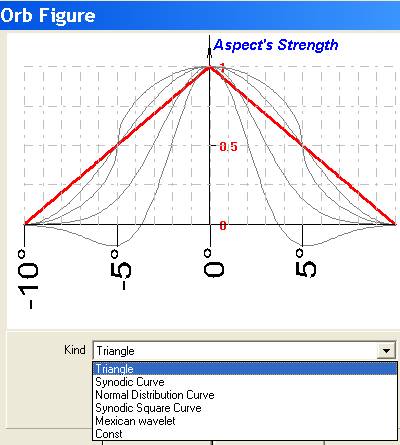
�Sergey has built this
into Timing Solution�s so the user can change the Orbs shape. Timing Solution
comes already set as Normal Distribution Curve. Let�s take a look at where this
is found and what happens when you change them.
�First on the main
screen at the top you will see �Options� click on it and under there you will
see �Orbs Figures�
�In here is where you change
it on the main screen. And also in Events Model Editor you have a button at the
top that is label
Orbs Figure.� 

�You want to
make sure that you work with the same orb figures in Building and then when you
run it in NN.
These are the Options you have to work with. Myself I like
the Triangle better for this type of Model.
��������������� �Sergey built these into TS but a lot of us
have not or perhaps hasn�t worked with them.
�I�m going to show what
the outcome is when working with both of them. Once again, you should work with
them and watch how the results of each one may change your end results. Some
markets works better with one then with another one.
When I�m building this type of Model I have found that the
Triangle works better.
�In both of
these are the same aspects that we have been talking about. However the one on
the left the orb is set at �Normal Distribution Curve� and the one on the right
is working with �Triangle�. Now I know some of you may say, well this is no big
deal ! But wait a minute my friend, stop and think when you get this Model
Built and you have say 276 aspects working, yes it will be a big deal for the
Projection Line.
�Look at L2 on the left
and compare it with L2 on the right. Look again at L4 on the left and L4 on the
right. Both are Separating both are working 15 � orb�s. So yes there is a big
change in your outcome.
��������������� ����������������������� �How to
Build your Weights with Efficiency Test
��������� This is where the work
really begins. First you need to start building your Model in �Events Model
Editor� and as you go alone save each one in a folder with its own name and you
will know where it is. Cause later we will be going into Hyped �Model Editor�
and start adding these small Models together and putting in the weights.�
�Let�s start with the, �Sun
to Mercy�, and all of the angles we are going to work with. Then we will do, �Sun
to Venus� , and we will keep building until we get to the end. The end is
working with the Inner Planets vs. the Outer Planets. �Inner Planets are Sun Moon Mercury Venus� Mars
I treat it as Mars..� Outer Planets are
Jupiter Saturn Uranus Neptune and Pluto. �Now you may ask why I said Mars as Mars. �If you count Inner Planets there are four skip
Mars and count the outer Planets you have Five, in all counting Mars, you have
ten. I believe that the number 5 is a balancing act. �The outer Planets give us long term insight
and the inner Planets gives us short term insight. Why? Cause they all have
shorter distance to travel. Now here I would like to tell you about one of the
best books about Astro Cycles is by L.J. Jensen name of this book is
Astro-Cycles & Speculative Markets. �On the inside book jacket it states, �This
work is a major contribution to scholarship in the field of economic
forecasting� as you get into this book you will find your mind looking at the
markets with new insight.
���������������
Now we are
going to work with Efficiency Test. This is where are going to get the �Weight
Numbers for our Model�
For some of you that do not know about Efficiency Test.
Sergey has already done some great write ups about its use and how to work with
it. You go to http://www.timingsolution.com/
and once you get there look for the Icon ![]() �
�
�The page will look
like this; 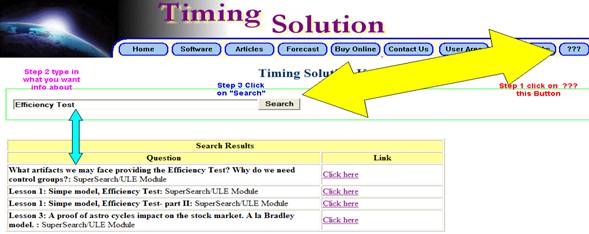
�In this Search Box you can type in any key
word you are looking for. I typed in Efficiency Test click on Search and these
are the results that came up.
Now we are going to build our file for this Model
Step 1 Go into ULE then click on
the Edit Button ![]() �and this will bring up, �Events Model Editor�
menu where we are going to start our Model. Once you get all of your Aspects
typed in you want to save this and give it a name, because our next step is to
open it up in HYPED and this is where we are going to place our WEIGHTS
for each aspect. Remember that when adding your aspects on each one you MUST
Click on Applying add it then Click on Separating. Work with one at a time.
Take a look at what I have already built this one, it is all the Aspects each
one has Apply and Separating with the orbs.
�and this will bring up, �Events Model Editor�
menu where we are going to start our Model. Once you get all of your Aspects
typed in you want to save this and give it a name, because our next step is to
open it up in HYPED and this is where we are going to place our WEIGHTS
for each aspect. Remember that when adding your aspects on each one you MUST
Click on Applying add it then Click on Separating. Work with one at a time.
Take a look at what I have already built this one, it is all the Aspects each
one has Apply and Separating with the orbs.
First before we began you need to
understand that the Aspects you are going to be working with depends on the amount of data you
have. Say you have ten years of data; you cannot get Aspects of the outer
Planets like Uranus to Neptune because this aspect takes 171.40 years to
happen. Sergey has built into Timing Solution it�s called Periods. Go to the
top of TS fine �TOOL� click on it and you will have a drop down list, Click on �Astro
Cycle Periods�. This is calculated every time you load data. It calculates
the amount of data you have loaded. Here I have data loaded from 12/01/1988 to
9/30/2010. Almost 22 years. If I pull up Astro Cycle Periods this is what it
shows me. The top line followed with a �d� tells you how many days it takes
�for this aspect, this is daily data, and we
need to decide what astronomical cycles can help with our research. planetary
periods. Take a look;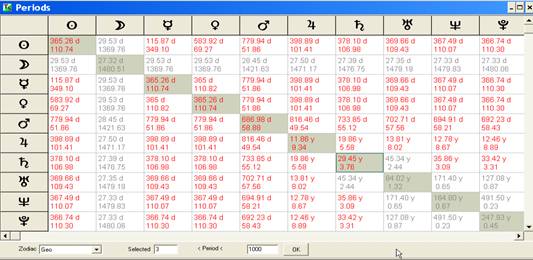
Once after you get started typing
in your aspects, be sure to check your ORB�s
so that you will know how to accurately
measure each one.
On the left shows the start of building this Model. Be sure to
remember that when you add
each one that you Check and Uncheck Applying and Separate. �highlighted in Yellow. You need
each aspect to have its own weight. So put in Apply and set the Orb �then click on +
then Uncheck Apply and Check Separate then click the +
button to add it to your file. Now look at L5 is in the color Magenta this is
something you do not want to do, the
reason is that you are using Apply and Separate together. You will not get the
true results of an aspect by doing it this way.
The picture on the right I�m showing when you make your
measurement you will know how many days before�
(0� Culmination) ��Or working with Separate you would measure
from 0� to the end of the aspect. Look at point A is the beginning of L3 Apply
Max Orb 03�, Point B is the end of this aspect. Do the same with the other side
Separate. Look a little closer at how the Orb is played out. Below I�m showing
you how 3�, 5�, 10� and 15� orbs are working in TIME. Each time you change the
Orb you need to know how to measure the size of the Orb in time.
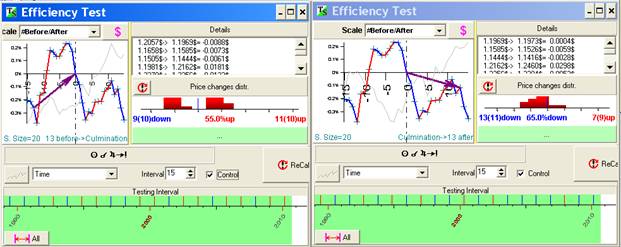
Let�s pick on Sun to Jupiter.
Working with Efficiency Test and getting the numbers we need to make this Model
Work.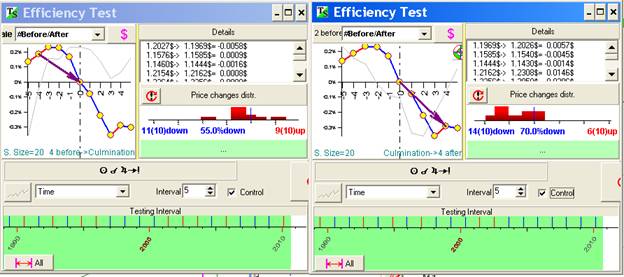
Working with 3� Orb Sun to Jupiter at 0� (Culmination) on the
left you have Applying and on the right we have Separating. Now the Numbers
that we need to plug into our Model are the numbers in the center� � %� So for the
Apply we will use 55% and for the Separate use 70%. Note when you see these
numbers in Blue
means Down, Red means up.
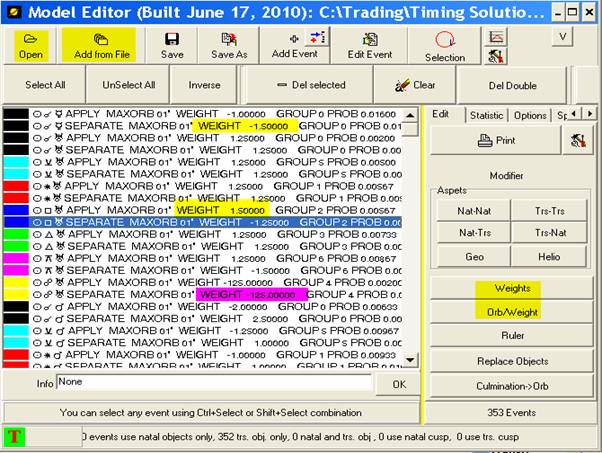
Let�s look at one more; this is Sun
to Jupiter with 10 � Orb. On left is Apply and on the right is Separate. Note
also that the Orb is bigger so the length of time is more. With Apply we have 55% up
and with Separate is 65% Down.
The number system I use and feel
free to change them for the Market you are working.
91�95 = 3.00������������ 91 �95 = -3.00������������ These are the important numbers that you
86�90 = 2.75������������ 86�90 = -2.75����������������������� will be plugging into your Model.
81�85 = 2.50������������ 81�81 = -2.50
76�80 = 2.25������������ 76�80 = -2.25
71�75 = 2.00������������ 71�75 = -2.00
66�70 = 1.75������������ 66�70 = -1.75
61�65 = 1.50������������ 61�65 = -1.50
56�60 = 1.25������������ 56�60 = -1.25
50�55 = 1.00������������ 50�55 = -1.00
�Our next step is to
get into HYPED ( Also named Model Editor) you will fine HYPED in Timing
Solution Advance. The Icon for this looks like this ![]() �
�
In here is where your work begins and your Model takes shape. Let�s take
a look at HYPED and see what is inside.
�The first Icon at the
Top is Open this is where you open your file. The next Icon to the right, Add
from a File is where you can open another file and it will add it to the end of
the file you already have open. Thank Goodness this Icon is here, cause you
will fine yourself building a file then come back later and pick back where you
left off at. I build mind in sections. This way I can work a little and trade
and still be able to pick up where I left off at.
�See the BLUE line going across �Sun 90�to
Uranus�? When we plug in our numbers from Efficiency Test this is where these
numbers are put in.
�So you would start at the top and work down
the list until you find the end.
�I�m going to point out a couple of items to
beware of. You see the weight I highlighted in Magenta? Do not do that.
Your
weights should be only one number then a period. Your number system runs from
3.00 to -3.00.
�Another pieces of info the Button label Weights
here you change one item or the hole sheet at one sweep. You can also
highlight by holding your mouse down and drag down through what you want to
change.
�Let�s walk through one, so you understand what
we are doing.� Click on first line, (it
should be highlighted) then Click on Icon Orb /Weights, in here is where you
will set the Weight you can also change your Orb. Your Orb should already be in
place.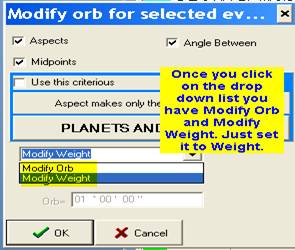
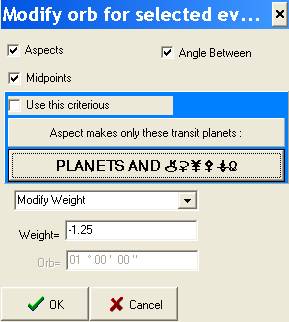
Now
once you type in the correct weight you want then click ok. That line is done
move down to the next line and put its weight in. Working with type of model it
really helps to have a 26 inch or 32 inch screen. You will fine after a while
you will stop and come back and work some more on it. I do mine in bites and
pieces.� It is like eating an Elephant
one bite at a time.
�The best part is once you get this done, you
will have a great road map and you can be assured that forecast line is being projected
correctly.
�Be sure that you save your work so Neural Net
can pick it up and run it.
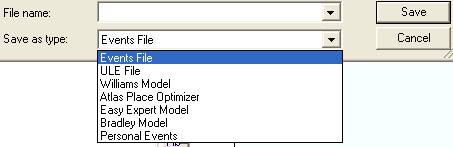
�You have a pick as to how you want to save
this Model. Save it as �Events File� the NN can pick it up.
�� ��������
�� �������������������������������������������� In
Closing
� ������� This type of Model is
not for everyone it is not a quick fix and by all means it is not the Golden
Grill. I have had some good returns and it has served me well. I have found and
so will you that this model will lead you through the up�s and down�s as the
markets work there time out.
����������� Once
you get to the end and test it, I have found by loading it into Excel and
writing a Macro to pick the highest numbers and lowest numbers, you will be
able to tell which Planets are working best for said market. This will lead you
into researching the Planets that plays the most action for said market.�������
����������� �I truly hope that is outline will be able to
help you as a Trader to full fill your goals.
�I have enjoyed sharing this information and
hope it was time well spent.
�
�Any input from you the end user is more than
welcome.
�� Enjoy and the best of luck to you.
����������� Captain Randy Cole
������������� 12/7/2010��������������������������������������������
�
�
������������������������������������� ����������������������������